Element Failure
One simple step during installation, if overlooked, can damage your brand new hot water heater's element and set you up for another work order way too soon.
Why Does a New Water Heater Fail?
A resident calls with no hot water on the coldest day of the year. After checking records, you see that the water heater is only a month old, so why would it be failing?
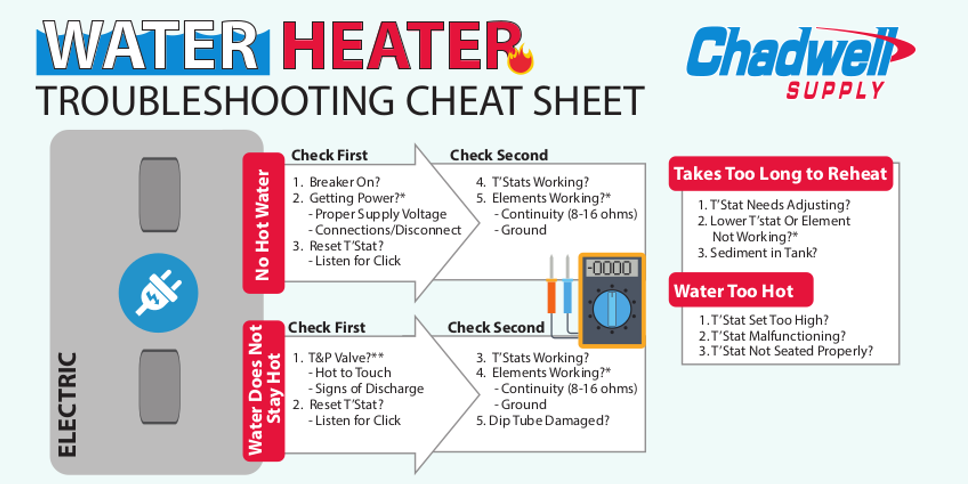
Troubleshooting: Run a diagnostic test by checking the element and thermostat. If the element is bad, it may not be an issue from the manufacturer. Instead, could the water heater have been installed and the power turned on before the tank had a chance to completely fill?
If this was the case the element has been “dry-fired”. When an empty water heater is powered on, the temperature of the element is raised to a destructive point if there is no cold water for it to react to.
A dry-fired element can be damaged to the point of failure in 30 to 45 seconds, or it may last several months and fail. In either case, the element will fail sooner than it should and will need to be replaced.
The lesson here is to take the time to wait for the heater to completely fill with water before turning on the power. This takes less time than changing out the element later.
How to Change a Water Heater Element
Step-by-Step
- Shut off power at breaker.
- Double check there is no power running to the heater.
- Drain the water heater.
- Remove the access panel and expose the element and t-stat.
Pro Tip: for heaters with incorporated blankets, pull back the safety cover and insulation and use tape to hold the insulation out of the way. - Disconnect the wires from the element; taking notes of which terminal each wire is connected to.
Pro Tip: Take a picture with your phone, so it is easy to refer to for re-installation - Use a breaker bar with a water heater element wrench fitting to unscrew the element.
- Carefully remove the element making sure not to ding or scratch the threads on the heater.
- Make sure the seal is in good shape and seated properly on the new element.
- Put the element inside the heater, screwing it in finger tight and then use the breaker bar to tighten.
- Connect the two wires (check notes or picture to verify placement).
- Once wires are in place, replace the safety cover, pull the insulation into place and secure the access panel.
- Then TURN ON THE WATER and let the heater completely fill.
- ONLY ONCE THE HEATER IS FULL, turn on the power by turning on the breaker.
Pro Tip: Not being patient and turning on the power before the tank is full will cause the element to be dry fired, shortening the heating elements life and causing even more time to be needed to replace it. So JUST WAIT!
Quick Check for Element Continuity
- Turn off power to heater.
- Set your meter to ohms or continuity (model specific).
- Take the probes and place one on each terminal end of the element.
- If the meter beeps (or reads 8 - 16 ohms) there is continuity; the element is good.
- If there is no tone, then the element is bad.
Full Water Heater Diagnostics are available here.