Water Heater Diagnostics
Troubleshooting an electric water heater involves checking the wiring that has a significant amount of current and it can be lethal. It is important to have an understanding of how to use a multimeter (digital or analog) tester, as well as taking the right precautions (including turning off the power) before opening the access panels and determining what needs to be fixed.
These step-by-step instructions were created to help troubleshoot and diagnose issues with an electric water heater thermostat and element.
Verifying Power is Off
- Turn off the power at the breaker.
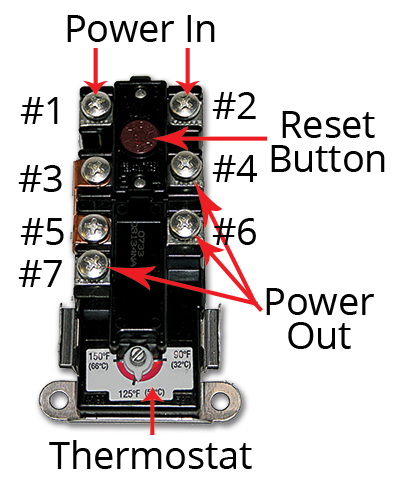
- Use a multimeter set to 250 V to verify the power is off by touching the probes to the top terminals (#1 & #2) on the thermostat. There should not be any movement or reading on the tester.
Testing Thermostat Limit Switch
- Verify that power if off using the instructions above.
- Use a multimeter set to the lowest setting for resistance or ohms.
- Starting at the upper thermostat, check that the reset switch is not faulty by touching the one probe to the top left terminal (#1) and the other probe to the terminal directly under it (#3).
- Good: If the meter shows a reading of 0 (or close to 0) or the needle moves, there is continuity.
- Bad: If it does not move or does not show a reading, then the thermostat should be replaced.
- Repeat this process for the top right terminal (#2) and the terminal directly under it (#4).
- Good: If the meter shows a reading of 0 (or close to 0) or the needle moves, there is continuity.
- Bad: If it does not move or does not show a reading, then the thermostat should be replaced.
- If there is no issue with the reset switch, then the next step is to test the thermostat.
Testing Connectivity – Upper Thermostat
- Verify that power is off using the instructions above.
- Use a flat head screwdriver to rotate the temperature dial to the highest setting. You should hear a click.
- Touch the probe to the common terminal (#5) and then to the heating element terminal (#7).
- Good: If the meter shows a reading of 0 (or close to 0) or the needle moves, there is continuity.
- Bad: If it does not move or does not show a reading, then the thermostat should be replaced.
- 4. Touch the probe to the common terminal (#5) and then to the terminal that leads to the lower thermostat (#6).
- Good: The meter does not move or show a reading.
- Bad: The meter moves, indicating there is a fault.
- Now adjust the upper temperature dial to the coolest setting (you should hear a click).
- Touch the probe to the common terminal (#5) and then to the terminal that leads to the lower thermostat (#6).
- Good: If the meter shows a reading of 0 (or close to 0) or the needle moves, there is continuity.
- Bad: If it does not move or does not show a reading, then the thermostat should be replaced.
- Move to the lower thermostat and repeat the diagnostic in a similar fashion to the upper.
- On the lower thermostat adjust the temperature dial to the highest setting.
- Use the tester to check between the two terminals on the lower thermostat.
- Good: If the meter shows a reading of 0 (or close to 0) or the needle moves, there is continuity.
- Bad: If it does not move or does not show a reading, then the thermostat should be replaced.
- If the thermostats appear to have continuity, then the next step is to test the heating elements.
Testing Continuity - Heating Elements
- Verify that power is off using the instructions above.
- Use a multimeter set to the lowest setting for resistance or ohms.
- Remove both wires from the upper element to isolate it.
- Touch one probe to each terminal on the element.
- Good: The needle moves and you get a reading between 8-16 ohms.
- Bad: The needle does not move or does not show a reading.
- Now touch one probe to one terminal of the heating element and touch the other probe to the metal side of the tank.
- Good: The meter does not move or show a reading.
- Bad: The meter moves, indicating there is a short circuit and the element needs to be replaced.
- Repeat the grounding test for the other terminal on the element by moving the probe to the other element and touching the metal side of the tank.
- Good: The meter does not move or show a reading.
- Bad: The meter moves, indicating there is a short circuit and the element needs to be replaced.
- Move to the lower heating element.
- Remove the wires from the lower element.
- Touch one probe to each terminal on the element.
- Good: The needle moves and you get a reading between 8-16 ohms.
- Bad: The needle does not move or does not show a reading.
- Now touch one probe to one terminal of the heating element and touch the other probe to the metal side of the tank.
- Good: The meter does not move or show a reading.
- Bad: The meter moves or show a reading, indicating there is a short circuit and the element needs to be replaced.
- Repeat the grounding test for the other terminal on the element by moving the probe to the other element and touching the metal side of the tank.
- Good: The meter does not move or show a reading.
- Bad: The meter moves, indicating there is a short circuit and the element needs to be replaced.